Install & First Launch — Your First 5 Minutes
This page walks through everything between “I have a DMG” and “I have a working claude, codex, kimi, or Muse session in front of me.” Each step links to the deeper page that covers it in full — this one is the fast path.
What you need first
Section titled “What you need first”- macOS 15 (Sequoia) or newer. vord uses SwiftUI APIs that don’t exist on older macOS versions, so it won’t launch on anything earlier.
- Apple Silicon or Intel. Both are fully supported — there’s no architecture-specific build or feature gap.
- Your own coding-agent CLI. vord does not install, bundle, or manage any of them. Install and authenticate
claude,codex,kimi,grok, OpenCode, and/ormusethe way you already do, before or after installing vord — vord just needs to find them on your$PATHwhen you start a session. Any one of them is enough; you don’t need all of them. For Muse, that means Muse Code from Meta (muse, typically~/.local/bin/muse) and onemuse login(orMETA_API_KEY).
Download and install
Section titled “Download and install”vord ships as a notarized DMG from vord-app.dev, not the Mac App Store.
- Download
vord.dmg. - Open it and drag
vord.appinto your Applications folder. - Launch vord from Applications (or Spotlight).
Distributed builds (the beta and live channels) are Developer ID–signed and notarized, so Gatekeeper opens them without a fight — no right-click-to-open workaround needed. See Updates & Channels for what beta vs. live means and how vord updates itself afterward.
Sign in is required on first launch
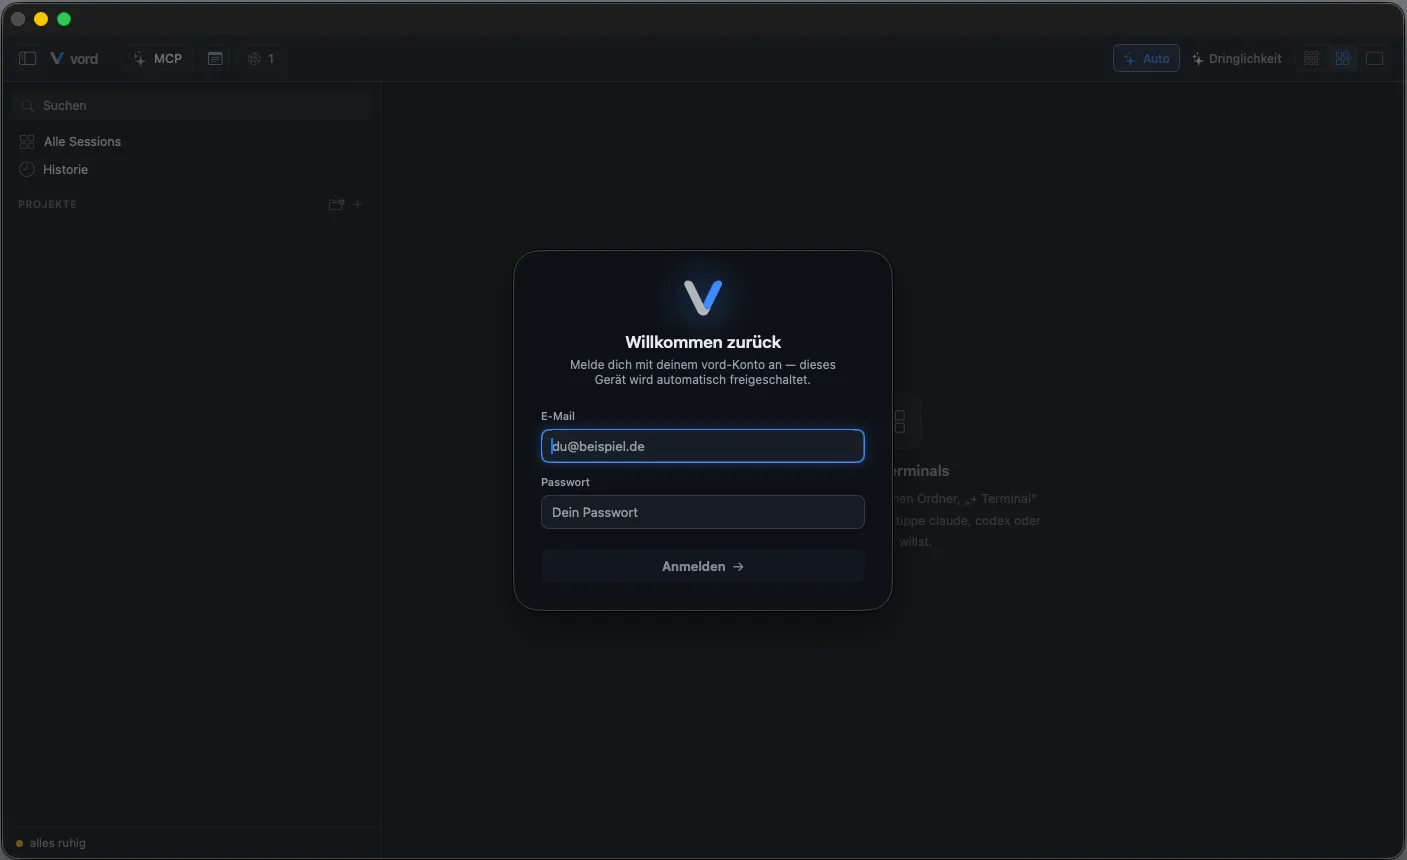
Section titled “Sign in is required on first launch”The first thing you’ll see is a full-window sign-in screen (“Sign in to vord”). It has no close or cancel button, and the cockpit behind it simply doesn’t exist yet — you sign in (or start a free trial), or you don’t get further.
- If you already have a vord account, enter its email and password and click Sign in.
- If you’re new, click Start free trial — it opens the signup page on vord-app.dev right away, with no email or password needed in the app. The trial itself starts there; Create an account at vord-app.dev is always under the two buttons if you’d rather go there directly.
- Once sign-in succeeds, the sign-in screen gives way to the cockpit and this Mac is activated.
This isn’t bureaucracy for its own sake: your trial, plan, and seat all live on the server, not in a local file, so there’s no meaningful way to use vord without an account behind it. There’s no license-key field anymore either — login is the only path in.
What you get after signing in — the 14-day trial, Basic vs. Pro, what happens when a license or the trial lapses — is its own page: Account, License & Trial.
Granting notification permission
Section titled “Granting notification permission”Early in the first launch, vord asks macOS for permission to send notifications — the standard system permission dialog, not something vord draws itself. Approve it if you want a native banner when a session finishes or needs you; that’s how vord tells you a session went from working to waiting without you having to keep tabbing back to check.
If you dismiss or deny the prompt, vord keeps working — you just won’t get banners, and you’ll need to watch the cockpit’s status dots yourself. You can revisit this later in System Settings → Notifications → vord, or fine-tune what triggers a banner at all under vord’s own Settings → General → Notifications. Full detail: Notifications.
The guided start (factory-fresh only)
Section titled “The guided start (factory-fresh only)”If this is a truly fresh setup — no projects and no sessions yet — the cockpit doesn’t show its usual “No terminals” placeholder. Instead you get a three-step guided start:
- Open a project — the same New Project sheet described below (open a folder or clone a repo), just one click away.
- Pick an agent — all six agent kinds (Claude, Codex, Kimi, Grok, OpenCode, Muse), with their live status on this Mac: signed in as …, installed, not signed in (with a Sign in button that opens the account connect sheet), or not installed (with a How to install link to Agent Accounts). If exactly one kind is ready, it’s preselected; if several are ready, nothing is preselected — you choose. vord doesn’t favor any agent over another.
- Start your first session — nothing starts on its own. The card tells you upfront that this starts a real session on your account and uses a small amount of your plan quota (or API credits). A checkbox — “Send a short intro prompt so the agent asks you what to work on”, on by default — controls whether vord sends one short first message once a real, empty composer is ready. Uncheck it and the session simply opens, untouched.
After choosing a project and agent, vord brings the third card into view even in a small window; you can also use the numbered step labels to jump between cards. If the agent asks you to trust a folder, sign in, approve a permission, or answer a question, do that yourself. vord never answers those prompts and keeps the opted-in intro visibly pending until the composer is ready, including after a slow start.
The moment the agent finishes its first turn and waits for you, the tile turns amber — that’s the point of vord — a short toast says so, and the guided start marks itself complete. From then on the normal cockpit takes over; the project and the session are regular objects you can keep using.
The first session is real: it runs on the account you selected and uses some of that assistant’s quota or API credits. For the separate quota and local usage views, see Usage & quota.
Don’t want the tour? Click “I know my way around — skip” at the bottom and it never comes back. Changed your mind later? Settings → Sessions → Guided start → “Show guided start again” re-arms it — it reappears the next time the cockpit is completely empty (no projects, no sessions).
Opening your first project
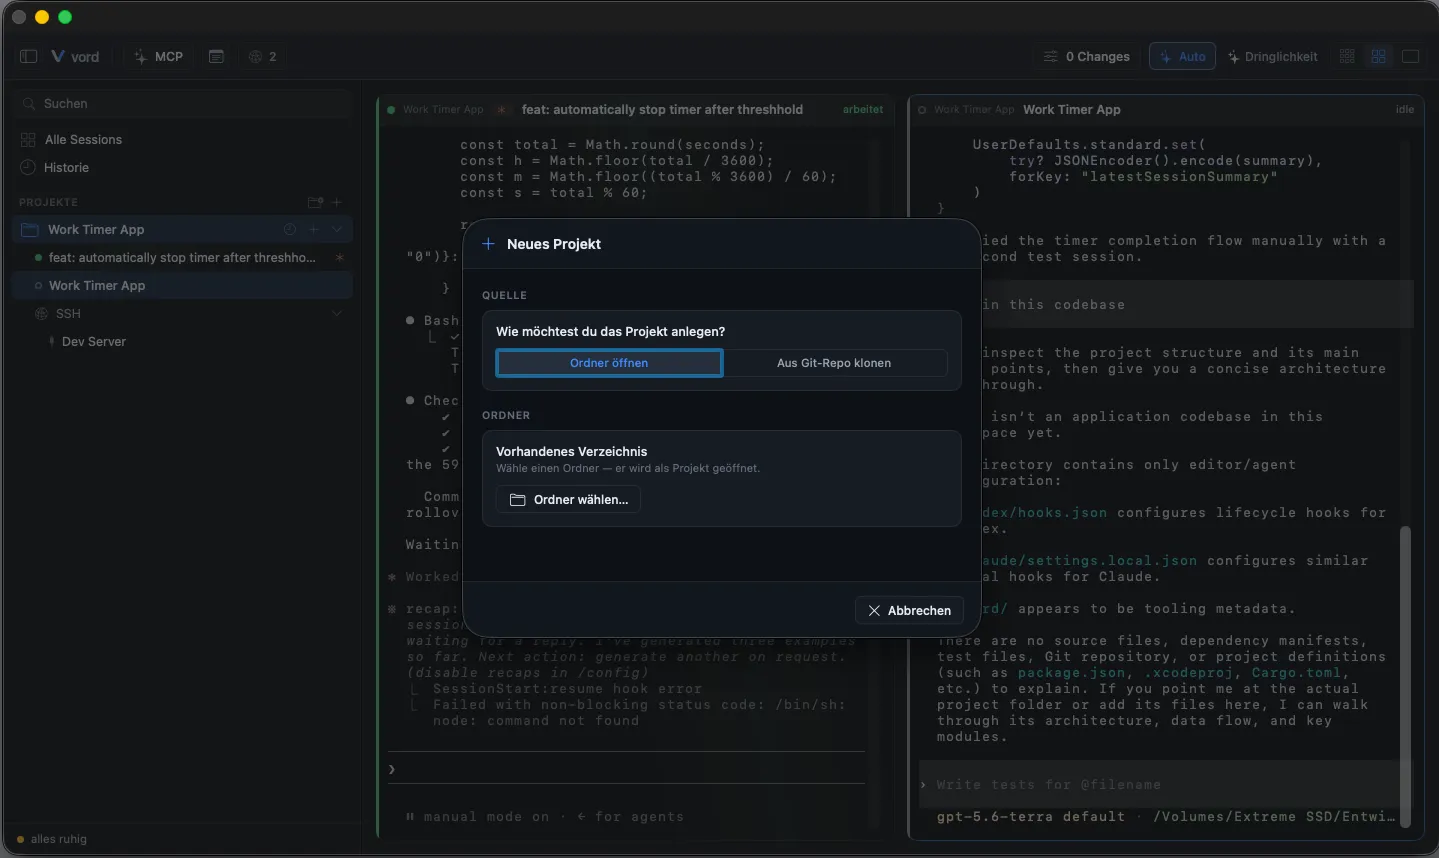
Section titled “Opening your first project”A “project” in vord is just a local folder — usually a Git repo, but it doesn’t have to be. You open one of two ways:
- Click the + button in the sidebar.
- In the New Project sheet, pick a mode:
- Open folder (the default tab) — click Choose folder…, which opens a native folder picker, and select the directory you want. The project appears in the sidebar immediately, selected and ready.
- Clone from Git repo — paste a repo URL (HTTPS or SSH), pick a parent folder to clone into, confirm the destination preview, and click Clone. vord runs
git cloneusing your existing Git/SSH credentials (it doesn’t manage credentials itself) and opens the result as a project once it finishes.
- If the folder you opened turns out to contain several Git repos as subfolders (a monorepo wrapper), vord notices and offers to add each one as its own child project — you can accept, deselect individual ones, or skip it and just open the parent folder as a single project.
Neither path requires a Pro plan or any other gate — this works the same on Basic. Full reference, including project colors and reordering: Managing Projects.
Starting your first session
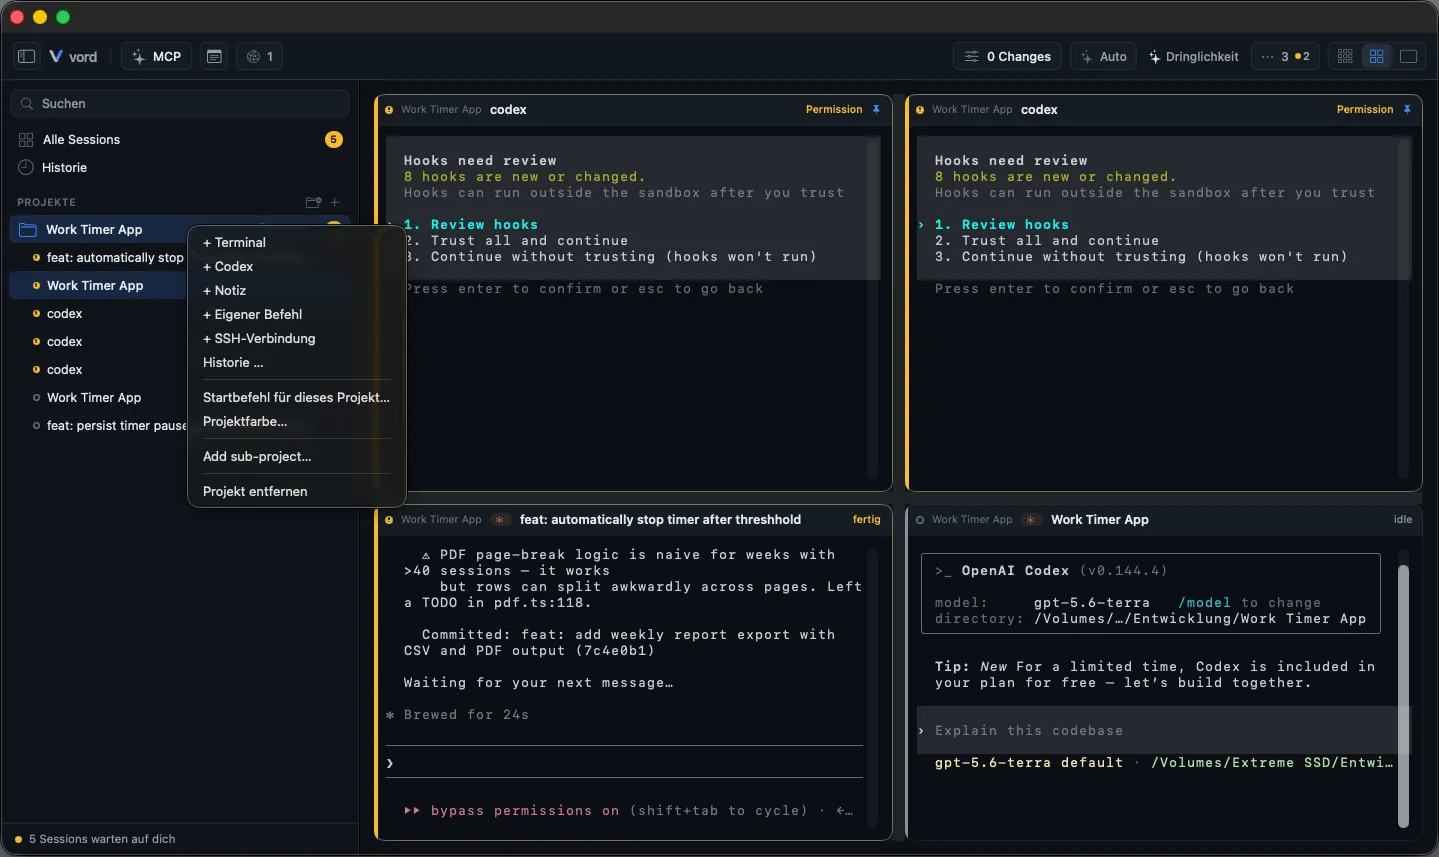
Section titled “Starting your first session”A session is one running unit of work in a project — a claude, codex, kimi, Grok, OpenCode or Muse agent, a plain Terminal (login shell), or an SSH connection. All of them land as equal tiles in the cockpit grid with the same status detection. There’s no single “+ menu” that lists every kind side by side; each has its own entry point in the sidebar.
The fastest first session is a Terminal, because that’s how you run claude:
- Click the + icon at the right edge of your project’s row in the sidebar (or press ⌘T with the project in focus). This starts a plain login shell (
zsh -l) as a tile in the cockpit. - Type
claudeand hit Enter. vord watches the terminal output and, once claude announces itself, starts tracking its status — green while it’s working, amber the moment it’s waiting on you.
If you’d rather not type claude every time, set a startup command (per-project or global in Settings) so a new Terminal launches it automatically. Hold Shift while clicking + to skip that command once and get a bare shell.
The other kinds live in the project row’s right-click menu:
- + Codex — a native one-click spawn: vord starts the real
codexbinary directly, no typing. This item is greyed out if vord can’t findcodexon your Mac. The first codex session in a project also needs a one-time trust step inside codex’s own TUI before vord can read its status reliably — see Claude, Codex, Kimi, OpenCode, Grok & Muse for that gap. - + Kimi — the same one-click spawn for the real
kimibinary, greyed out if kimi isn’t installed. No trust step: vord’s hook block in kimi’s global config reports status from the first session. - + Grok — the same one-click spawn for the real
grokbinary, greyed out if Grok isn’t installed. - + OpenCode — the same one-click spawn for the real OpenCode CLI, greyed out if it isn’t installed.
- + Muse — the same one-click spawn for the real
musebinary, greyed out if Muse isn’t installed. The first start in a new folder shows Muse’s own trust question as a 🟡 box. - + Terminal — the same plain login shell as the + icon above.
- + SSH connection — create a saved SSH connection (or pick an existing one from the SSH pool in the toolbar). The local working directory stays your project folder; only the shell runs remotely.
There is no one-click claude button on the Mac — claude starts inside a Terminal (typed, or via the startup command), which is a deliberate choice, not a missing feature. Full walkthrough of all six kinds, what vord injects, and what happens if your trial has lapsed: Starting Sessions.
Where to go next
Section titled “Where to go next”You now have vord installed, signed in, and one session running. From here:
- Account, License & Trial — what your 14-day trial actually covers, and what changes at Basic vs. Pro.
- The Hub — plans, team, devices, and Cloud add-ons in the browser.
- A Tour of the vord Window — the sidebar, cockpit, toolbar, and side panels, so the rest of the app makes sense.
- Starting Sessions — the full detail on all session types, auto-start commands, and resuming past sessions.
- Notifications — tune exactly when and how vord tells you a session needs you.
- Updates & Channels — how vord keeps itself current, and what pauses updates.
- Stuck on something? Check the FAQ for system requirements and other first-run questions.